27 Dutch Braid Hairstyles That Looks Complicated But Is Super Easy
If you’ve ever seen someone walk by with a stunning Dutch braid and thought, “I could never do that” think again. Dutch braids look like they took hours of salon practice, but most of these styles can be done in under 15 minutes with a little patience and the right technique. Whether your hair is thick, thin, short, or long, there’s a Dutch braid variation that works for you. This guide walks you through 27 gorgeous styles, each with simple, honest tips you can actually use at home without spending a dime on a professional.
Classic Single Dutch Braid
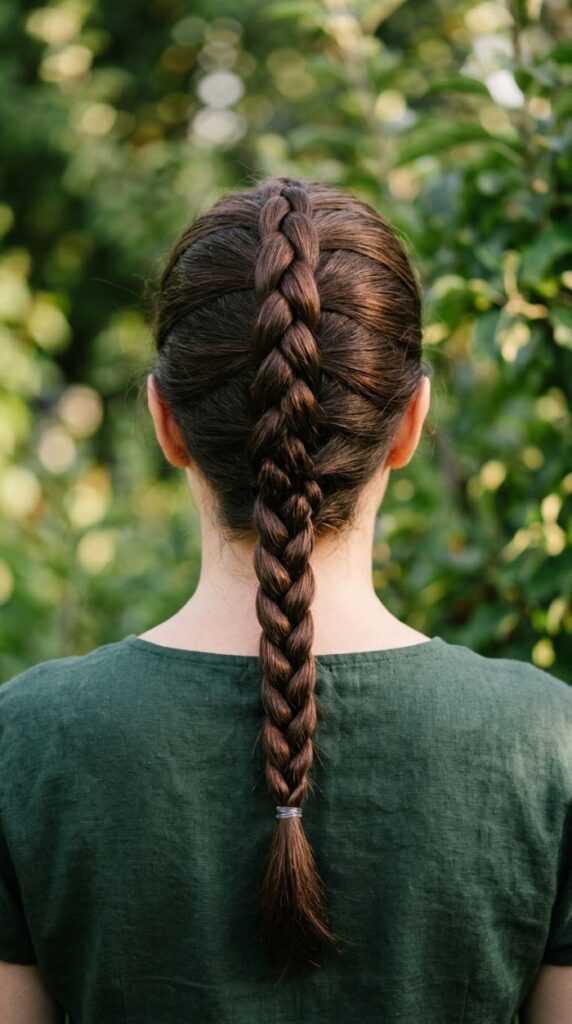
The classic single Dutch braid is the foundation of every style on this list. Once you get this one down, everything else becomes easier. Start by parting your hair down the center and gathering a small section at the top of your head. Divide it into three equal parts. Now here’s the key difference from a regular braid instead of crossing strands over the middle, you cross them under. Left strand goes under the middle, then right strand goes under the middle. Each time you cross a strand, pick up a small section of hair from the scalp and add it in. This is what gives the braid that raised, 3D look. Keep your tension consistent not too tight, not too loose. Work slowly at first. Speed comes naturally with practice. Secure the end with a small elastic. You can leave the tail loose or tuck it under with a bobby pin. This style works on all hair types, including fine hair if you tease it lightly beforehand. Budget tip: You only need a comb, two hair ties, and some water spray to get started.
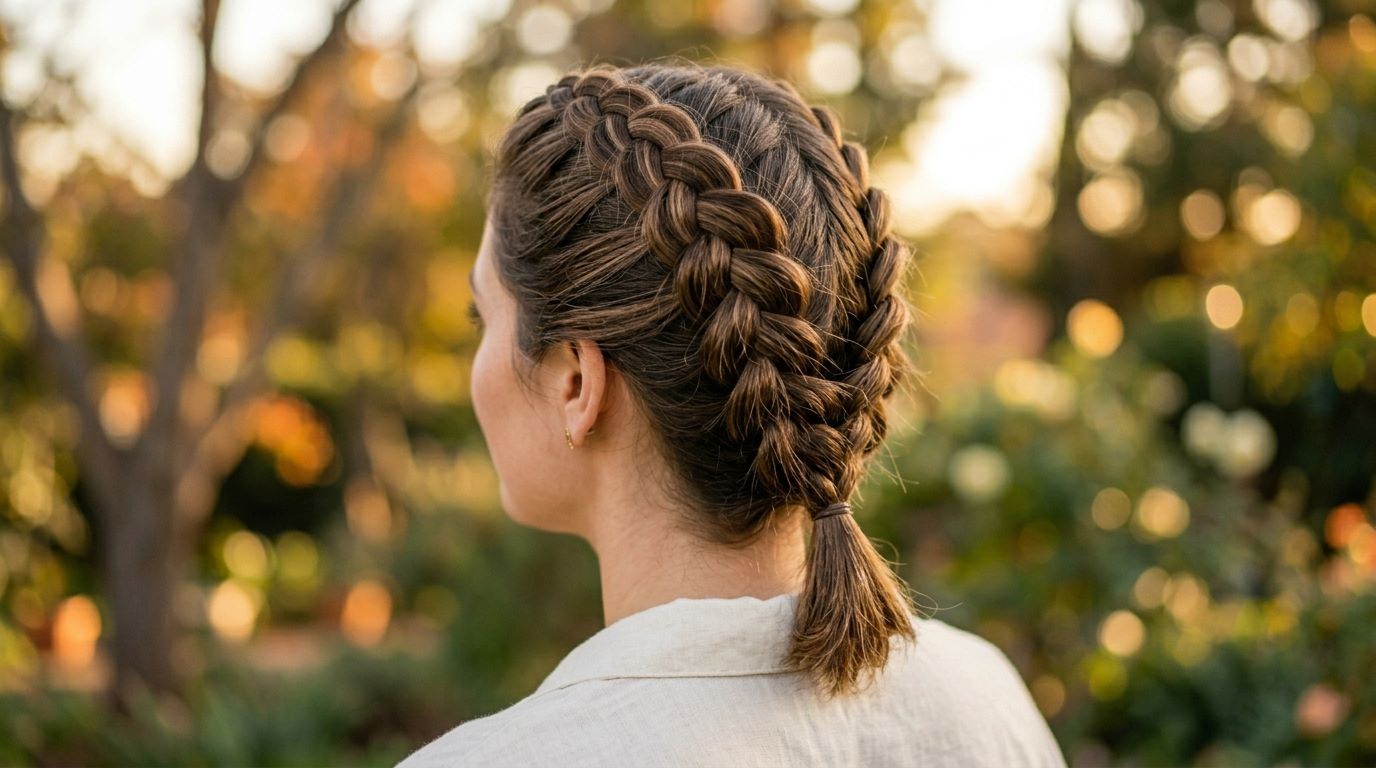
Double Dutch Braids (boxer braids)
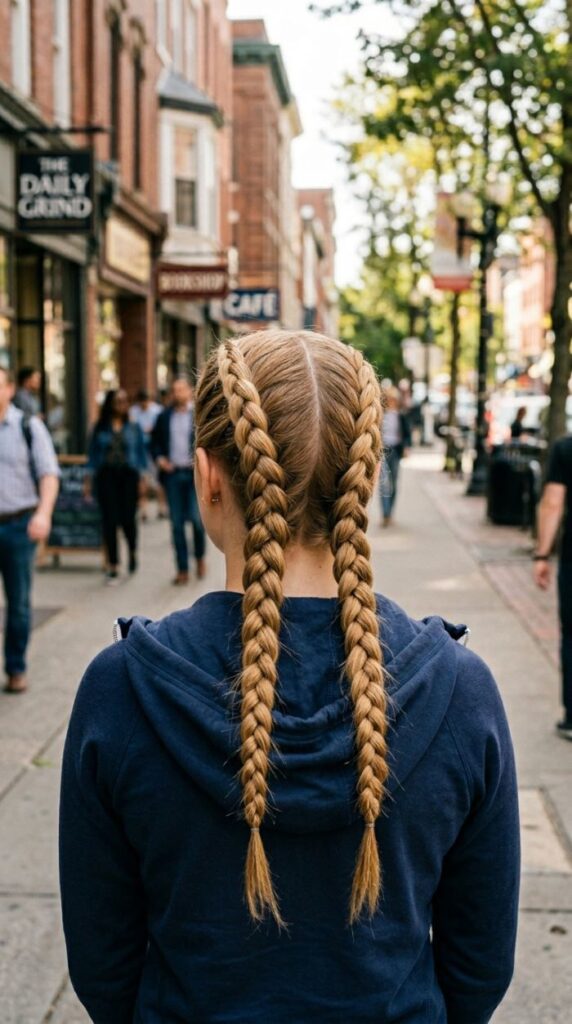
Double Dutch braids also called boxer braids are one of the most searched hairstyles online for good reason. They look sharp, hold all day, and work on almost every hair type. Start with a clean center part from forehead to nape, splitting hair into two equal sections. Clip one side out of the way. On the other side, pick up a small section at the hairline and begin your Dutch braid, crossing strands under instead of over. Add hair from the scalp as you go, keeping sections small and even. Once you reach the nape, finish in a regular braid and secure the end. Repeat on the other side. The trick to making both sides look even is to work on one section at a time and use a mirror to check your part. These braids are perfect for the gym, school, or a casual day out. They also work beautifully as a base for other styles like space buns or a braid crown. Budget tip: A rattail comb costs about $1 at the dollar store and makes clean parts much easier.
Dutch Crown Braid
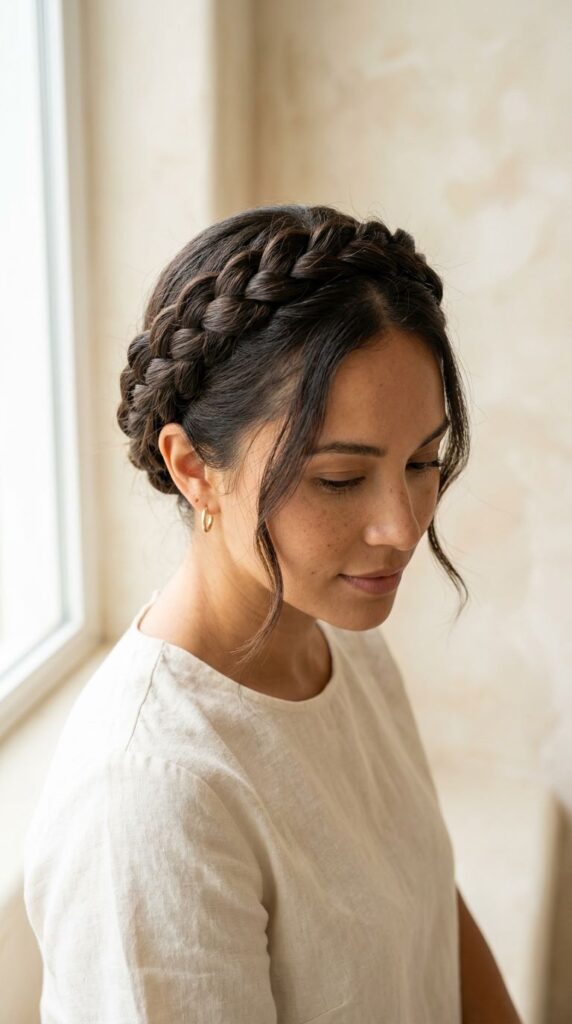
The Dutch crown braid looks like something out of a fairy tale, but it’s more doable than it appears. The secret is starting at one ear and working all the way around. Part your hair from ear to ear across the top of your head. Take the front section and begin a Dutch braid, starting at one temple and adding hair as you braid along the hairline toward the other ear. Once you run out of hair to add, continue in a regular braid and pin the tail behind the opposite ear, tucking it under the braid to hide it. Secure with bobby pins. This style is popular for weddings, graduation photos, and outdoor events. It keeps your hair completely off your face and lasts all day with a few bobby pins and a light hold spray. If your hair is on the shorter side, try two smaller braids pinned to meet in the middle same effect, less length required. Budget tip: Dollar store bobby pins in your hair color are all you need to secure this style. No expensive clips necessary.
Dutch Braid into a Ponytail
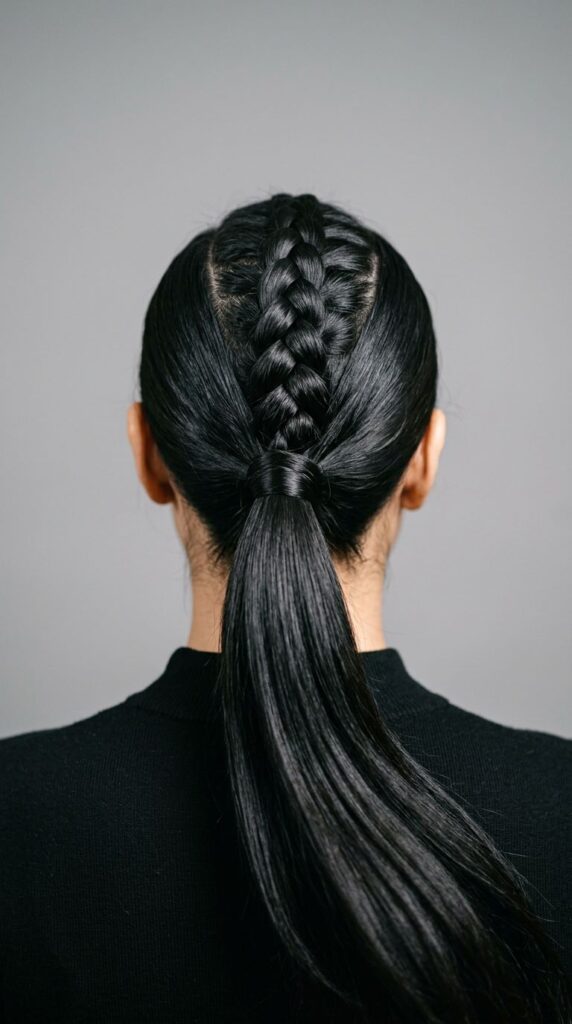
This is one of the easiest ways to make a plain ponytail look like you tried hard. And the best part it takes less than 10 minutes. Start a Dutch braid at the crown of your head, crossing strands under and adding small sections as you go. Braid down about 3–4 inches, just enough to create a visible braided section at the top. Then gather all your hair braided section included into a ponytail and secure it with an elastic. The braid creates a sleek, structured look at the top while the rest of your hair falls naturally below. You can make the ponytail high and sleek, or low and loose both look great. To make the ponytail look more polished, wrap a small piece of hair around the elastic and pin it underneath. This hides the hair tie completely. This style is great for work, school runs, or casual events. It holds well without hairspray, but a light spritz keeps flyaways in check. Budget tip: Skip the silk scrunchies for now a basic elastic works perfectly fine.
Side Dutch Braid
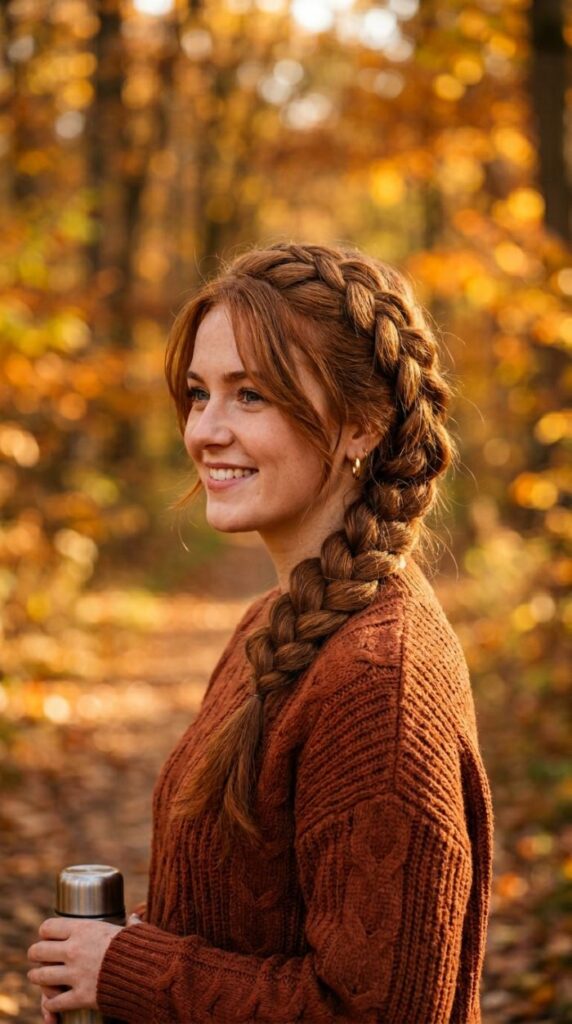
The side Dutch braid is a relaxed, effortlessly cool version of the classic style. Instead of braiding straight down the back, you sweep everything to one side and it changes the whole look. Start at one side of your head, near the temple, and begin your Dutch braid, crossing sections under and adding hair from the scalp as you go diagonally across the head. Keep working until you’ve gathered all the hair toward one shoulder, then continue in a regular braid down the length of your hair. Secure with an elastic. For a softer finish, gently tug on the edges of the braid with your fingertips to loosen it slightly. This “pancaking” technique gives the braid more width and a boho feel. This style looks especially nice on wavy or textured hair because the natural texture adds volume to the braid. It’s also a great option if your hair isn’t perfectly even in length. You can hide shorter layers easily by folding them into the braid as you go. Budget tip: Braid over slightly damp hair for a cleaner, easier grip without any product.
Dutch Braid Bun
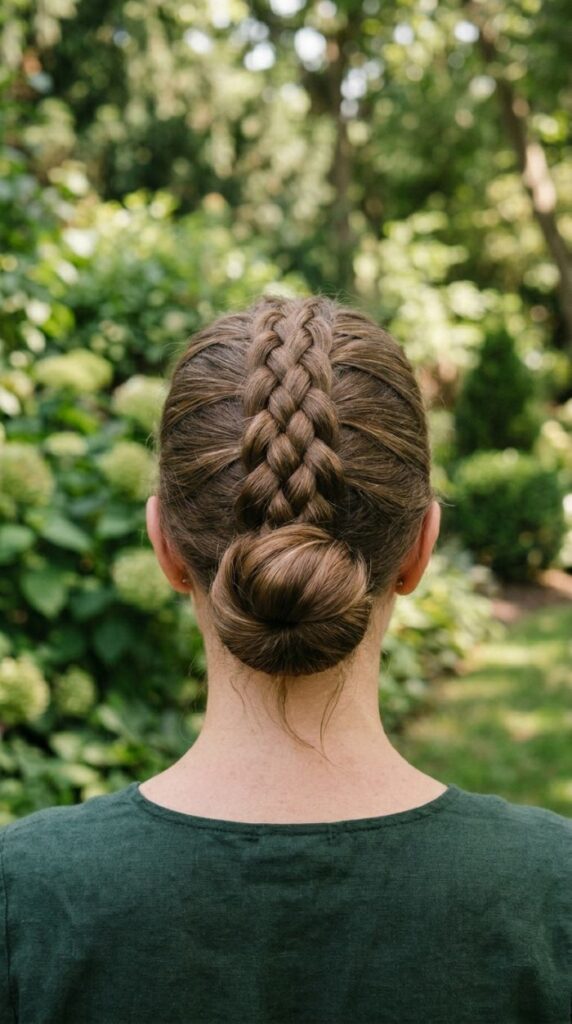
This is the Dutch braid style for days when you want to look put-together without spending much time or energy. Start a Dutch braid at the crown, adding hair as you go down toward the nape. Once you’ve gathered all the hair in, continue braiding a few inches further, then twist the remaining length into a bun and secure it with bobby pins or an elastic. The braid leads right into the bun, creating one seamless, elegant style. This works especially well for medium to long hair. If you have thick hair, pin the bun in sections rather than all at once it holds better that way. For a messier, more casual version, loosen the braid slightly and let the bun be a little undone. For a formal version, keep everything smooth and tight with some light gel at the hairline. This style is ideal for work presentations, family events, or any occasion where you want your hair completely off your neck. It stays in place for hours. Budget tip: Grab a small mesh bun net from a dollar store it makes the bun look neat and holds it longer.
Dutch Braid Updo
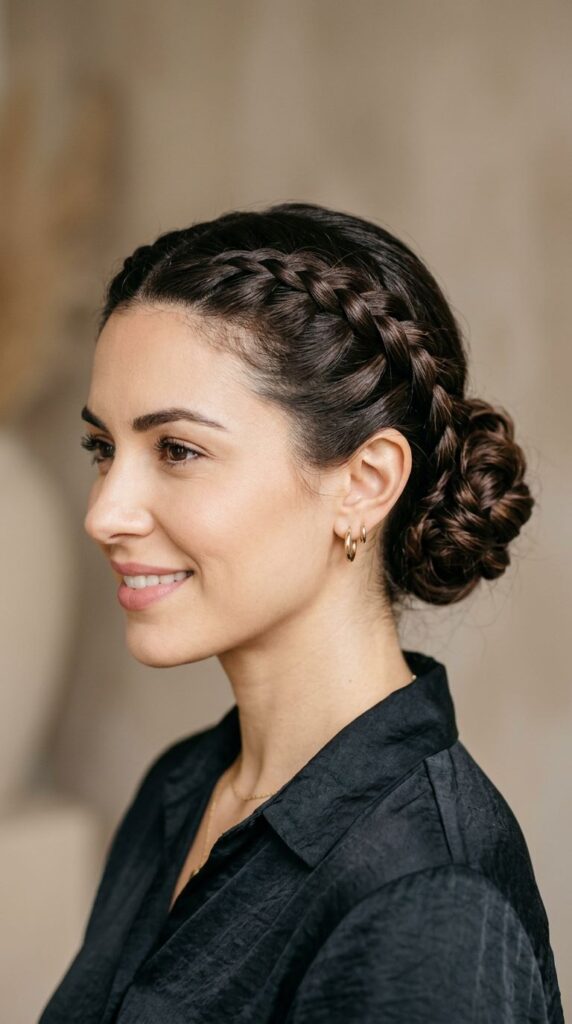
A Dutch braid updo sounds fancy, but it’s really just two braids pinned together cleverly. Start with two side Dutch braids, one on each side of your head, and braid them down to the ends. Then cross one braid over the other at the back of your head and pin them flat against your scalp. Tuck the ends under and secure with as many bobby pins as needed. You can also twist the ends into small buns before pinning for extra volume. The result looks like a salon-worthy updo. This style works great for weddings, graduation, or any special event where you want your hair up but don’t want a boring ponytail. The braids provide structure and grip, so the updo stays put all day even in humidity. Use a light-hold spray after pinning to tame any flyaways without stiffening the style. For fine hair, tease the braids gently before pinning to add body. Budget tip: Buy a pack of assorted bobby pins they usually come in 50–100 count for a dollar or two and are all you need for this look.
Dutch Braid with Curls

Dutch braids and curls together are a stunning combination, and you don’t need a stylist to pull it off. Braid the front or crown section of your hair in a Dutch braid, just enough to create a structured top section. Let the rest of your hair hang loose. Then curl the loose section using a curling wand or even foam rollers if you’re on a budget. The braid at the top creates a polished anchor while the curls below add softness and drama. This is a great style for birthdays, date nights, or any event where you want to look a little dressed up. If your hair is naturally curly or wavy, even better just braid the top and let your natural texture do the work below. Scrunch in a little curl cream before starting to define your natural curls. Budget tip: You don’t need a $100 wand a $10 basic curling iron from a drugstore works perfectly for this look. Or skip heat entirely and twist damp hair into pin curls overnight.
Dutch Braid Headband

This is one of the prettiest low-effort Dutch braid styles you can do. The Dutch braid headband frames the face beautifully and works on most hair lengths. Part your hair from ear to ear, separating the front section. On one side, start a Dutch braid right at the ear and work it across the front of your head following the hairline to the other ear. Keep sections small for a dainty, delicate look. Once you reach the other ear, secure the end with a small elastic or bobby pins and tuck it behind the ear. The rest of your hair can be left down, curled, or pulled into a loose ponytail. This style is great for keeping hair off your face without using any actual headbands or accessories. It’s perfect for spring and summer days when you want something light and casual. If you want a thicker braid, pick up larger sections as you add hair. For fine hair, go small and tight for the best result. Budget tip: No extra products needed just a comb, some water mist, and two bobby pins.
Waterfall Dutch Braid
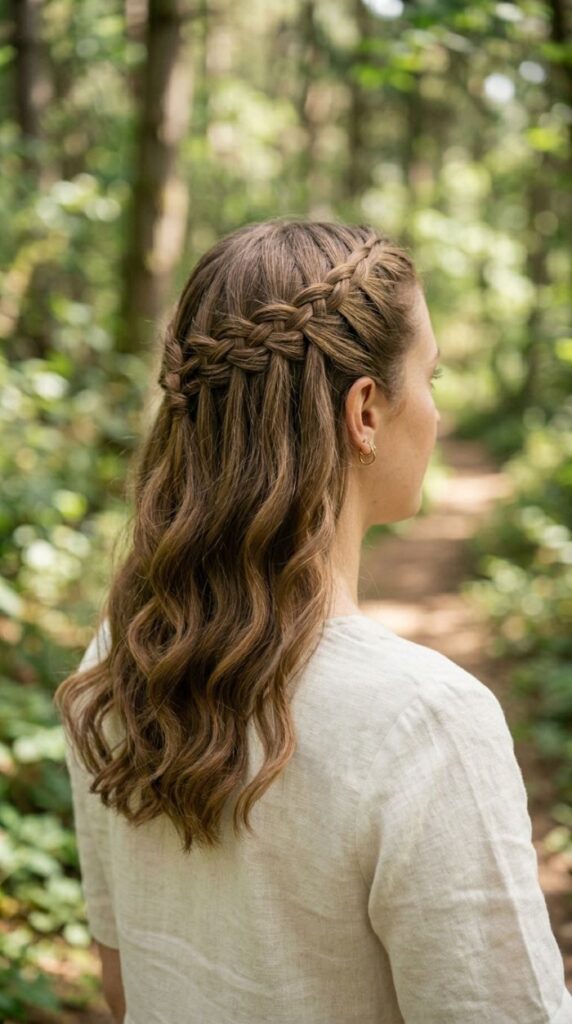
The waterfall Dutch braid looks incredibly intricate but uses a simple trick that makes it much easier than it appears. The technique is just like a regular Dutch braid, but instead of adding new hair into the bottom strand, you drop it and pick up a new section from the scalp. This creates a “falling” effect where strands seem to flow through the braid. Start on one side at the temple, pick up three sections, and begin Dutch braiding across the back of your head. Each time you cross the bottom section under, drop it and pick up a fresh piece of hair from the scalp beneath it. Continue across the head and secure with a pin or small elastic at the end. The dropped strands hang loosely, giving the style that waterfall appearance. This is a breathtaking style for outdoor events, photos, or casual wear. It looks complicated but once you do it twice, the motion becomes automatic. It works best on wavy or slightly textured hair because the dropped strands have more visual presence. Budget tip: No products are needed this style speaks for itself.
Dutch Braid into Space Buns

Dutch braid space buns are playful, youthful, and honestly really easy to make. Start with a clean center part and divide your hair into two sections. On each side, start a Dutch braid at the hairline and braid upward toward the top of your head, adding hair as you go. Once you’ve gathered all the hair in, twist the remaining length into a small bun and pin it in place. Repeat on the other side. The braids give the space buns a structured, elevated look compared to just twisting the hair up directly. This style is perfect for music festivals, casual days, or any time you want something fun and low-maintenance. Use bobby pins generously space buns that fall apart are more frustrating than they’re worth. If you have shorter hair, you can still make small buns by looping the hair through the elastic rather than wrapping it fully. Budget tip: Skip the expensive accessories. These buns look best clean and simple, with just a couple of pins to secure everything.
Dutch Braid Fishtail Combo
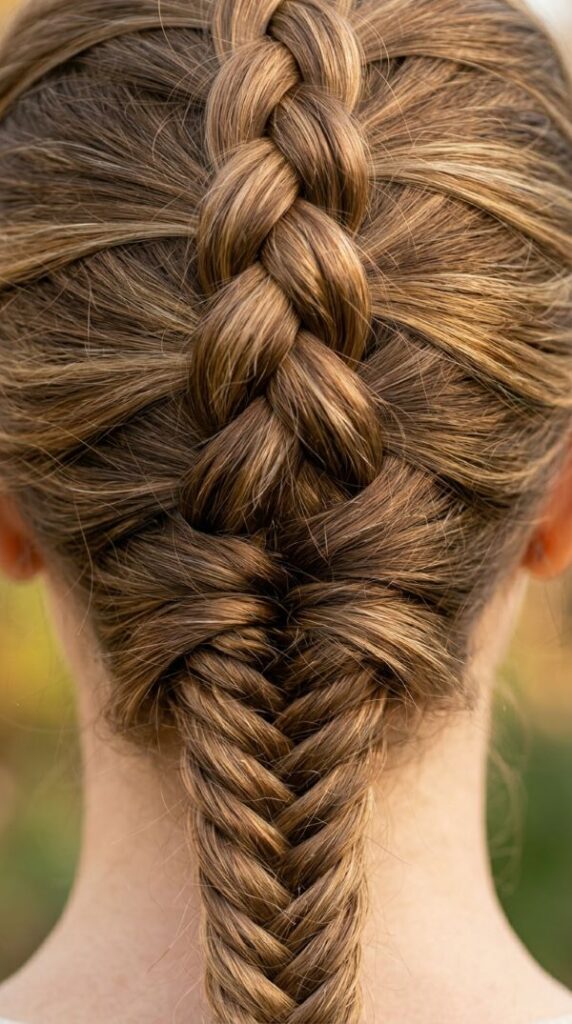
Combining a Dutch braid with a fishtail braid below creates one of the most eye-catching mixed-technique styles out there. Start a standard Dutch braid at the crown and braid about halfway down the head, adding hair as you go. Once you’ve gathered all your hair in, switch to a fishtail braid by dividing the remaining hair into two sections and pulling small pieces from the outer edge of each section and crossing them over to the opposite side. Keep going until you reach the ends and secure with an elastic. The contrast between the two textures the structured Dutch braid on top and the intricate fishtail below is genuinely beautiful and looks like you spent hours on it. This works best on medium to long hair. If your hair is on the thinner side, braid loosely and gently tug to widen both sections. Budget tip: This style needs zero products to look good just a brush, water, and a hair tie. Save your styling products for other days.
Half-Up Dutch Braid
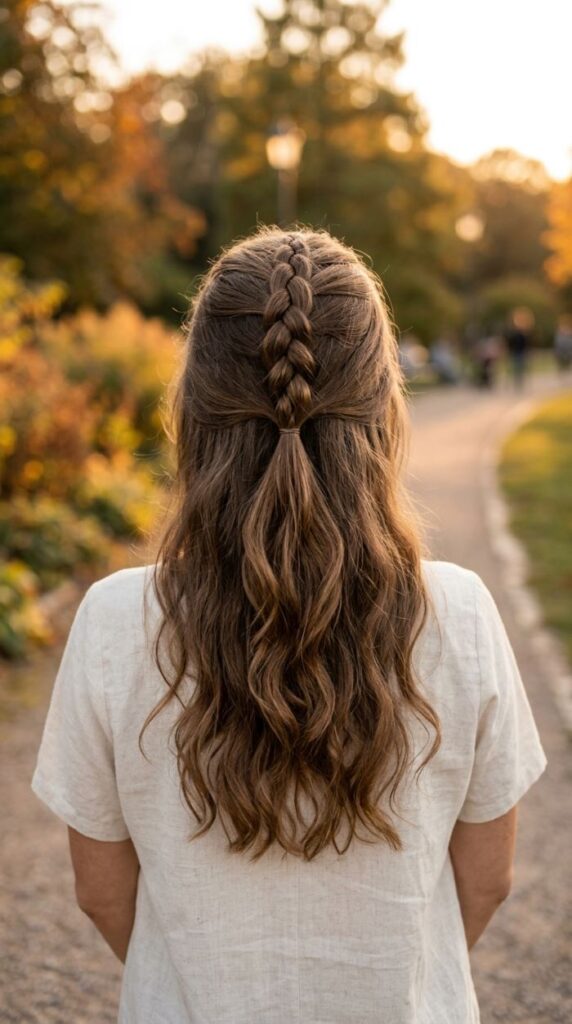
The half-up Dutch braid is the perfect middle ground between casual and styled. It keeps the front and top of your hair neat while letting the rest flow naturally. Separate the top half of your hair from ear to ear and clip the bottom half out of the way. On the top section, start a Dutch braid at the crown and braid down, adding hair from the top section only as you go. Once you’ve used all the top section, secure the braid with a small elastic, letting the ends blend into your loose hair below. Pull the bottom hair down to join the tail of the braid. The result is a clean, structured top with free-flowing hair below. This is one of the most flattering styles for oval and round face shapes because it adds height at the crown. It also works well for second-day hair when the top needs some help but the rest is fine. Budget tip: Refresh the loose ends with a tiny bit of coconut oil rubbed between your palms it adds shine without weighing hair down, and a jar lasts months.
Reverse Dutch Braid (French Braid Look)
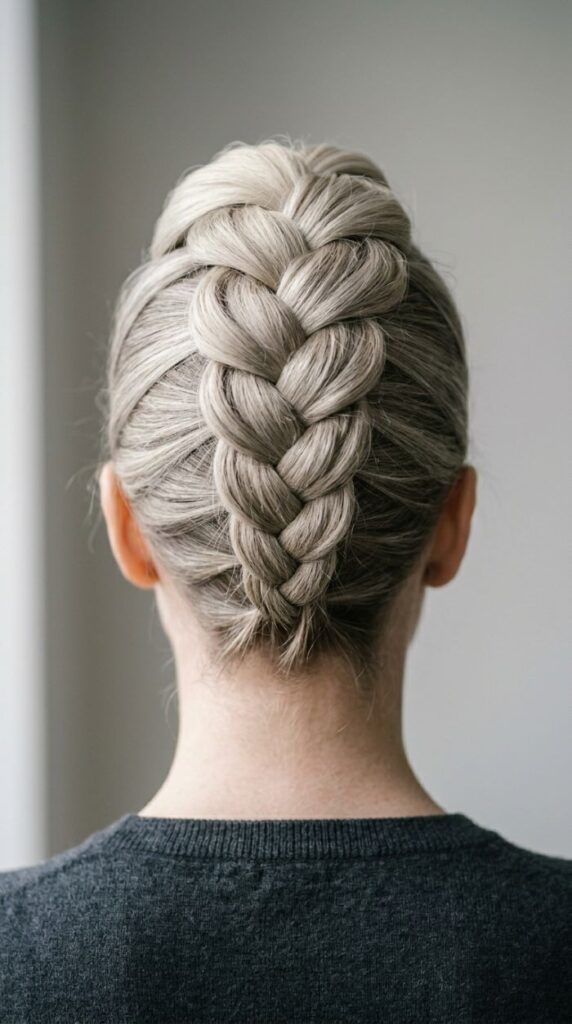
A reverse Dutch braid is simply a Dutch braid braided upward from the nape instead of downward from the crown. The technique is identical, but starting at the bottom changes the direction of the braid and creates a completely different look. Begin by gathering a small section at the nape of your neck. Divide it into three parts and start crossing strands under, adding hair from the scalp as you work upward toward the crown. This is actually a great way to practice the Dutch braid technique because it can feel more natural for some people to work in this direction. The finished result looks very similar to a French braid from the front, but has the distinctive raised texture of a Dutch braid from the back. This style looks especially sharp in fine, straight hair where the braid definition really shows. It’s also a great option if you like updos but want something different from the standard look. Budget tip: Braid slightly damp hair for easier control when working upward no gel or mousse required.
Dutch Braid Ponytail with Wrap
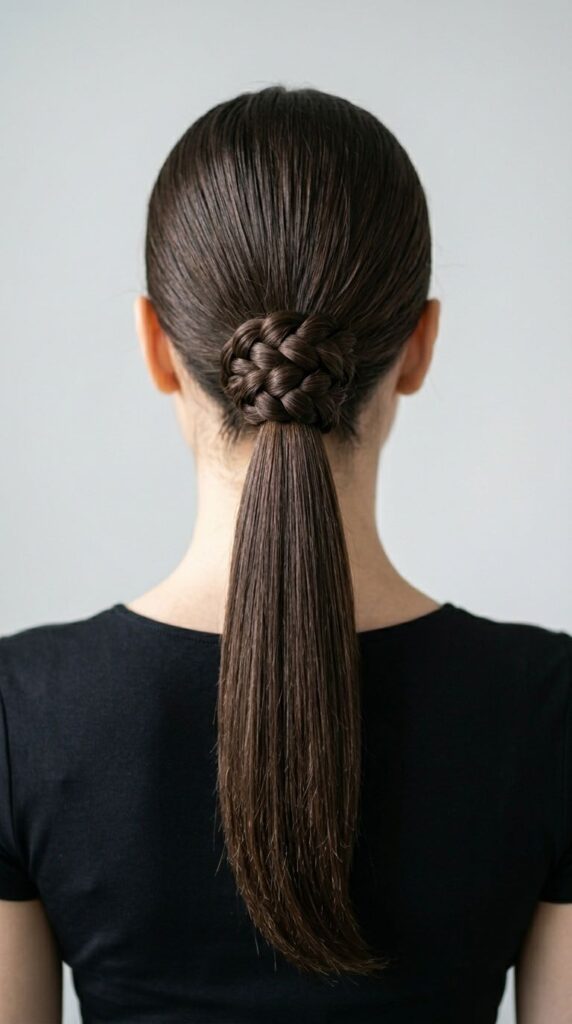
This ponytail variation adds a small wrapped braid around the base to make a regular style look ten times more elevated. Start by pulling your hair into a high ponytail and securing it with an elastic. Now take a small section from the underside of the ponytail and create a short Dutch braid just two or three crossing sections then wrap it around the base of the ponytail to hide the elastic. Secure the wrapped braid end with a bobby pin underneath. That’s it. The wrapped Dutch braid detail is subtle but makes the ponytail look intentional and polished. This is a great office hairstyle because it looks professional without being too fussy. It also holds extremely well throughout the day. For extra sleekness, apply a small amount of edge-control gel or even just hair conditioner along your hairline before pulling back the ponytail. This tames baby hairs and gives the style a clean edge. Budget tip: Edge-control gel from a dollar store works just as well as the salon brand versions for this purpose.
Dutch Braid Pigtails

Dutch braid pigtails are the grown-up version of the classic childhood style, and they’re surprisingly chic when done neatly. The key to this style is symmetry. Use a rattail comb to create a precise center part all the way down the back of your head. Clip one side away and work on the other first. Start a Dutch braid at the temple, adding hair as you go down the side of the head, and finish in a regular braid once you’ve incorporated all the hair. Secure with an elastic. Repeat on the other side. Spend a little extra time making the parts match it makes a big difference in how polished the final look appears. These braids can hang freely, be tied with ribbon, or wrapped with a small scrunchie at the ends for a fun detail. This style holds up well through outdoor activities and doesn’t require any touch-ups throughout the day. It’s a great option for kids’ school mornings, too. Budget tip: Satin ribbon cut into small strips and tied around each braid end adds a cute finishing touch and costs almost nothing.
Dutch Braid with Baby Hair Laid
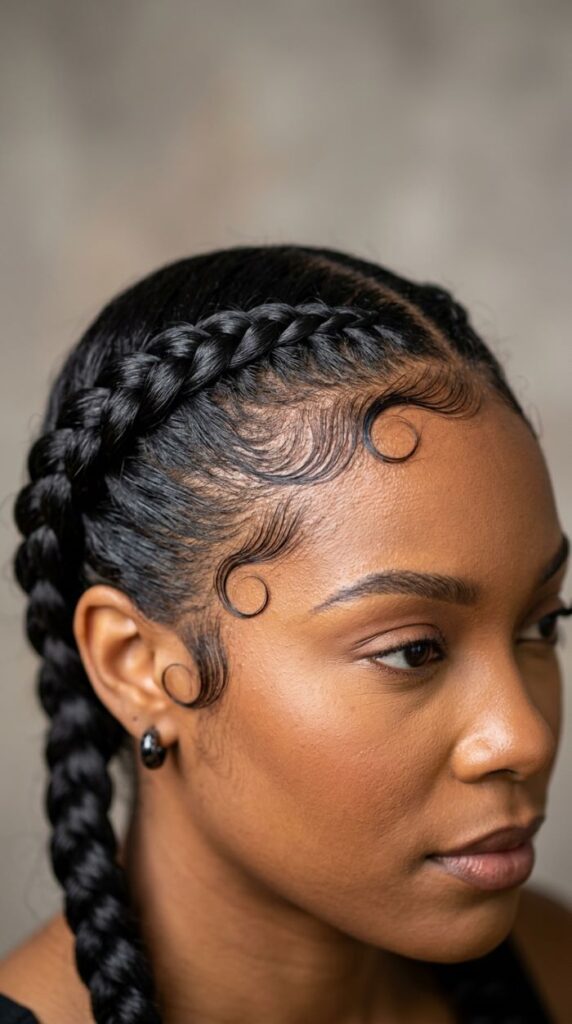
Laying baby hairs along with a Dutch braid takes the style from simple to stunning in just a few extra minutes. After completing your Dutch braid, use a soft-bristle toothbrush or a baby hair brush and a small amount of edge-control gel or hair butter to smooth down the tiny hairs at your hairline. Swirl them into gentle curves or swoops along your forehead and temples. This is a major styling move in many communities, and it completely changes the vibe of the braid. The result looks intentional, glamorous, and highly polished. You don’t need a lot of product less is more here. Start with a small amount and build up only if needed. Use a satin scarf or headband to press the baby hairs down for 5–10 minutes while you finish getting ready it helps them set in place. This style looks amazing in photos and is perfect for events where you want a clean, detailed look. Budget tip: A clean old toothbrush and a small jar of edge control from the dollar store is all you need to nail this look completely.
Conclusion
Dutch braids get a reputation for being hard, but the truth is they’re mostly about muscle memory. The first time feels awkward. The fifth time starts to feel natural. The tenth time, you’re doing it on autopilot while watching TV. Every single style on this list is achievable at home, with basic tools, and without spending money at a salon. Start with the classic single braid, get comfortable with the under-crossing technique, and build from there. Whether you want something casual for a school day or something polished for a wedding, there’s a Dutch braid on this list that fits. Pick one, try it today, and remember every great braid started as a messy first attempt.